
Loose fitted sheets can make an otherwise comfortable bed feel annoying. One corner slips off, the middle starts bunching, and by morning the sheet looks like it barely stayed on the mattress. That is exactly the problem Bed Scrunchie is designed to solve.
If you are wondering how to install Bed Scrunchie, the process is simple once you understand how the clips and tension cord work together. You attach the clips around the edge of the sheet, place the sheet over the mattress, pull the cord to tighten it, and lock the tension in place. The first setup may take a few extra minutes, but after that, it becomes much easier.
This guide explains the full installation process, what comes in the package, how to use it with different sheets, and how to fix common setup issues.
Quick Answer: How Do You Install Bed Scrunchie?
To install Bed Scrunchie, place your fitted sheet on the mattress, attach the clips around the sheet edge, fit the sheet over the mattress, pull the adjustable cord until the sheet feels snug, lock the cord, and tuck the extra length under the mattress.
The main goal is to create even tension around the entire sheet. When the clips are spaced properly and the cord is tightened evenly, the sheet stays flatter and is less likely to pop off the corners.
Here is the basic process:
- Lay the fitted sheet across the mattress.
- Attach the clips around the sheet edge.
- Keep the clips spaced evenly.
- Fit the sheet over the mattress.
- Pull the cord until the sheet feels secure.
- Lock the cord in place.
- Tuck away extra cord.
- Smooth the sheet and check all corners.
Do not pull the cord as hard as possible. The sheet should feel firm and smooth, not overstretched.
What Comes in the Bed Scrunchie Package?
A Bed Scrunchie package usually includes the parts needed to secure your fitted sheet from underneath the mattress. Each piece has a specific job, so it helps to understand the parts before installing them.
Adjustable Tension Cord
The tension cord is the main part that pulls the sheet inward under the mattress. Once the clips are attached to the sheet, this cord tightens the entire setup. It helps keep the fitted sheet from shifting while you sleep.
Sheet-Gripping Clips
The clips attach directly to the sheet edge. These clips hold the fabric while the cord creates tension. Most setups use multiple clips around the sheet, so the pulling force is spread more evenly instead of being focused on one spot.
Tightening Buckle or Lock
The cord lock keeps the tension from loosening after you pull the cord. Once the sheet feels secure, you lock it in place so the cord does not slide back during the night.
Setup Instructions and Storage Pouch
Some packages include a simple instruction card and a pouch for storage. The pouch is helpful when washing sheets because it keeps the clips, cord, and lock together instead of leaving them loose in a drawer.
Before You Start Installing Bed Scrunchie
Before you begin, take a minute to prepare your sheet and mattress. A little setup work can prevent uneven tension, slipping clips, and repeated adjustments later. Here is what you need to do.
Check Your Sheet Size and Mattress Fit
Make sure your fitted sheet is the correct size for your mattress. A queen sheet should go on a queen mattress, a king sheet should go on a king mattress, and so on.
Bed Scrunchie can help tighten a loose sheet, but it cannot fully fix a sheet that is the wrong size. If the sheet is too small, the fabric may pull too tightly. If it is much too large, you may have extra material that bunches under the mattress.
Lay Out All Clips and Cord Parts
Place the clips and cord on top of the bed before attaching anything. This lets you see how the system works and prevents you from missing a clip during installation.
If the cord is twisted, straighten it before you start. A clean, untangled cord is much easier to tighten later.
Make Sure the Sheet Edge Is Easy to Access
Keep the sheet loose at first so you can reach the edges easily. Do not tuck the sheet tightly under the mattress before attaching the clips. You need access to the sheet edge so each clip can grip properly.
How to Install Bed Scrunchie Properly
Installing Bed Scrunchie is easiest when you follow the steps in order. Do not rush the clip placement because that part affects how well the sheet tightens later. Follow these steps to install your bed scrunchie properly.
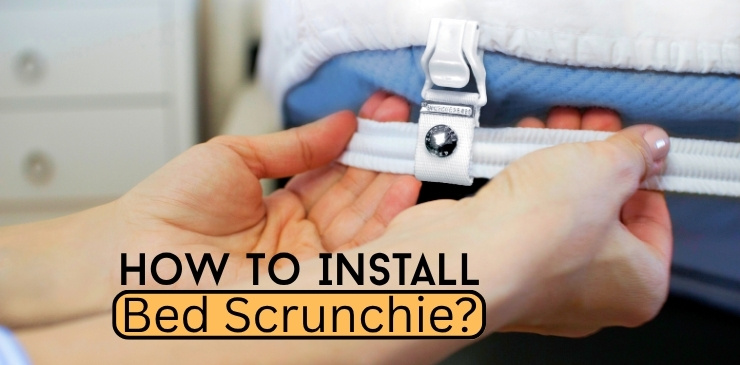
Step 1: Place the Fitted Sheet on the Mattress
Start by laying your fitted sheet over the mattress. Keep it spread out and centered, but do not fully tuck the corners yet.
The elastic edge of the sheet should be easy to reach. If the sheet is twisted or uneven at this stage, fix it before attaching the clips. A centered sheet gives you a cleaner final result.
Step 2: Attach the Clips Around the Sheet Edge
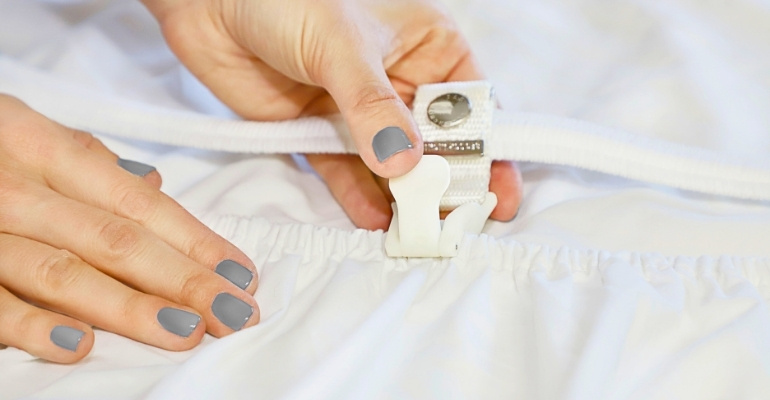
Next, attach the Bed Scrunchie clips to the edge of the fitted sheet. Work around the sheet carefully and make sure each clip is gripping the fabric securely.
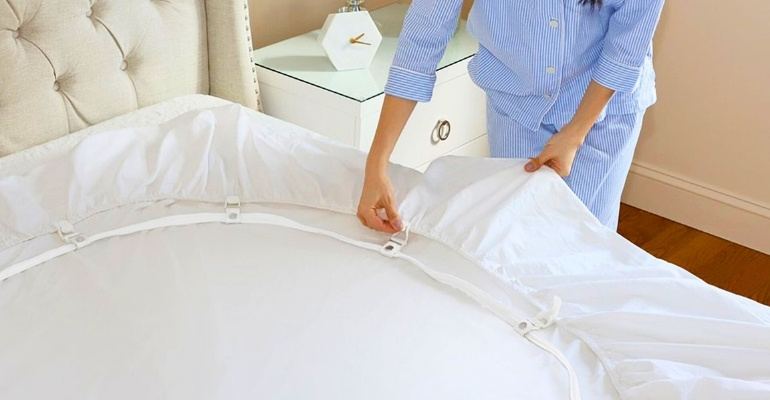
The clips should not be placed only in one area. They need to be distributed around the sheet so the tension pulls from multiple points. This helps prevent one corner from becoming tighter than the others.
Step 3: Space the Clips Evenly for Balanced Tension
Clip spacing matters. If the clips are too close together on one side and too far apart on another, the sheet may tighten unevenly.
A good approach is to use two clips near each corner area and keep them evenly spaced around the sheet edge. The exact spacing does not need to be perfect, but it should look balanced. Even spacing helps the sheet stay smoother across the mattress surface.
Step 4: Flip the Sheet So the Scrunchie Sits Underneath
After the clips are attached, position the sheet so the Bed Scrunchie system sits underneath the mattress once the sheet is fitted. Be gentle while moving the sheet so the clips do not come loose.
This is the step where many first-time users slow down, and that is normal. Make sure the clips remain attached, and the cord is not wrapped around itself.
Step 5: Fit the Sheet Over the Mattress
Now, place the fitted sheet onto the mattress the way you normally would. Pull the corners over the mattress and make sure the sheet covers all sides properly.
Before tightening the cord, check that the sheet is centered. If one side has much more fabric than the other, adjust it now. It is easier to fix before the cord is pulled tight.
Step 6: Pull the Cord to Tighten the Sheet
Find the cord ends and pull slowly. As you pull, the sheet should begin tightening around the mattress.
Use steady pressure rather than quick yanking. Pulling too aggressively may shift the clips or create uneven tension. The sheet should become smooth, snug, and secure without feeling like it is being forced.
Step 7: Lock the Cord and Tuck Away Extra Length
Once the sheet feels tight enough, use the cord lock to hold the tension. After locking it, tuck the extra cord under the mattress so it does not hang out.
This keeps the bed looking neat and prevents the cord from getting caught when you walk around the bed or change bedding later.
Step 8: Check the Sheet Surface and Corners
Run your hand across the top of the bed. Look for loose sections, wrinkles, or corners that feel weak. If one area is still loose, adjust the clips or tighten the cord slightly.
A properly installed Bed Scrunchie should leave the sheet looking smoother and feeling more secure around the mattress.
How Long Does Bed Scrunchie Take to Install the First Time?
If it’s your first time installing a Bed Scrunchie, expect the process to take around 15 minutes, depending on your mattress size and familiarity with the setup. Once you’ve installed it the first time, future adjustments or reinstallations usually take just a few minutes. Taking your time to position the clips and tighten the straps evenly will help you achieve the smooth, wrinkle-free finish the Bed Scrunchie is designed for.
First-Time Setup Time
For most users, the first setup may take around 10 to 15 minutes. This includes laying out the parts, attaching the clips, positioning the sheet, tightening the cord, and checking the final fit.
The process may take longer if you have a heavy mattress, a thick topper, oversized bedding, or slippery sheets.
Why the First Installation May Take Longer
The first time can feel slower because you are figuring out clip placement and cord tension. You may need to adjust the sheet once or twice before everything feels balanced.
This does not mean the product is difficult to use. It simply means the first installation has a learning curve.
How Setup Gets Faster After Practice
Once you know where the clips should go, the process becomes faster. Many people can install it much more quickly after the first few tries because they no longer need to study every step.
The biggest time-saver is keeping the cord untangled and placing the clips evenly from the beginning.
Can One Person Install Bed Scrunchie Alone?
You don’t need an extra pair of hands to set up a Bed Scrunchie. While lifting the corners of a larger mattress can take a bit more effort, most people can complete the installation on their own by working one corner at a time. If your mattress is particularly heavy or difficult to move, having someone assist can make the process quicker, but it’s not a requirement.
Best Solo Installation Method
The best method is to work section by section. Start with one side or one corner, attach the clips, then move to the next area.
When fitting the sheet, avoid trying to lift the entire mattress at once. Instead, lift one corner slightly, slide the sheet into place, and move around the bed. This keeps the process safer and easier.
When It Helps to Have Another Person
A second person is useful if the mattress is very heavy, very thick, or difficult to lift. One person can raise the mattress edge while the other adjusts the sheet and cord.
Help is also useful during the first setup because one person can keep the sheet centered while the other handles the clips.
Tips for Installing a Bed Scrunchie on a Heavy Mattress
Installing a Bed Scrunchie on a heavy mattress requires a slightly different approach, but it doesn’t have to be difficult. Instead of lifting the entire mattress, work one corner at a time and use the mattress’s natural flexibility to your advantage. A few simple techniques can make the installation easier, reduce strain on your back, and help you achieve a secure, wrinkle-free fit with less effort.
Work One Corner at a Time
Lift one corner just enough to guide the sheet and cord underneath. Then move to the next corner. This method is easier on your back and gives you better control.
Trying to lift the entire mattress can make the setup frustrating and may cause the clips to shift.
Use a Safe Mattress-Lifting Method
If you have trouble lifting the mattress by hand, use a safe support method. Some people use a mattress-lifting tool or ask another person for help. The goal is simply to create enough space to adjust the sheet underneath.
Never force the mattress upward if it feels too heavy. A slower setup is better than straining your back.
Avoid Overstretching or Pulling Too Hard
Heavy mattresses can press down on the sheet and cord, so pull gradually. If the cord feels stuck, check that it is not trapped or twisted under the mattress.
Overpulling can make the sheet too tight in one area while leaving another side loose.
Check Clip Placement Before Tightening
Before pulling the cord, look around the mattress and confirm that the clips are still attached. If a clip has loosened, fix it before tightening. Once the cord is locked, adjusting clip placement becomes harder.
Does Bed Scrunchie Work With Different Sheet Types?
One of the biggest advantages of the Bed Scrunchie is its compatibility with a wide range of fitted sheets. Whether you use cotton, microfiber, bamboo, jersey knit, or deep-pocket sheets, the system is designed to create a tighter, smoother fit by pulling excess fabric underneath the mattress. However, the material, thickness, and stretch of your sheets can affect how well they grip and perform.
Fitted Sheets
Fitted sheets are the easiest option. Since they already have elastic edges, Bed Scrunchie adds extra support by pulling the sheet tighter under the mattress.
This is especially helpful when fitted sheet corners keep sliding off or the middle of the sheet wrinkles overnight.
Flat Sheets
A flat sheet can be used, but it may require more careful setup. Because flat sheets do not have elastic corners, you need to make sure the fabric is centered and clipped evenly.
If one side has more fabric than the other, the sheet may pull unevenly when the cord is tightened.
Deep-Pocket Sheets
Deep-pocket sheets are made for thicker mattresses, but they can sometimes feel loose on standard mattresses. A bed scrunchie can help tighten the extra fabric underneath.
However, if the mattress is extremely thick or the sheet is oversized, you may need to spend more time adjusting the clip spacing.
Cotton, Bamboo, Microfiber, and Slippery Fabrics
Common sheet materials like cotton, bamboo, and microfiber can work well with Bed Scrunchie, but fabric texture matters.
Smooth or slippery sheets may need extra attention because the clips can shift if they do not grip firmly. Thicker fabrics often hold more securely, while very thin fabrics should be clipped carefully to avoid slipping.
Sheets on Mattress Toppers
Bed Scrunchie can also work with a mattress topper as long as the fitted sheet covers both the topper and mattress properly.
If the topper adds several inches of height, make sure your sheet has enough pocket depth. A sheet that barely fits may become too tight once the cord is pulled.
Does Bed Scrunchie Fit All Mattress Sizes?
If you’re worried about ordering the wrong size, you’re not alone. One of the reasons Bed Scrunchie is so popular is that it isn’t limited to a single mattress size. Its adjustable design lets you customize the fit for most standard beds, helping keep your fitted sheet smooth and firmly in place.
Twin, Full, Queen, King, and California King Beds
You can use Bed Scrunchie on popular bed sizes such as twin, full, queen, king, and California king. The adjustable cord allows the system to tighten around different mattress widths.
For larger beds, take extra care when centering the sheet. A small, uneven shift on a king-size bed can create noticeable looseness on one side.
Thick Mattresses and Oversized Bedding Considerations
Thick mattresses and oversized sheets may need more adjustment. If the sheet has extra fabric, keep it distributed evenly before tightening the cord.
If the sheet is too shallow for the mattress, Bed Scrunchie may not solve the problem because there may not be enough fabric to hold securely under the mattress.
Adjustable Beds and Moving Bases
Bed Scrunchie may work on adjustable beds, but installation should be done while the bed is flat. After setup, test the bed movement slowly.
If the sheet pulls too tightly when the base moves, reduce the tension slightly. Adjustable beds shift more than standard frames, so some trial and adjustment may be needed.
Common Bed Scrunchie Installation Problems and Fixes
Even with a simple setup process, you may run into a few common Bed Scrunchie installation issues the first time you use it. Problems like loose corners, uneven tension, slipping clips, or a twisted cord can affect how well it holds your sheets in place. The good news is that most of these issues are easy to fix with a few small adjustments. Below are the most common installation problems and practical solutions to help you get the best fit.
Clips Keep Slipping Off
If the clips slip, check the fabric thickness and clip position. Make sure each clip has enough material to grip. For thin or slick sheets, move the clips slightly deeper onto the fabric edge.
Also, check that the cord is not pulling one clip harder than the others.
Sheet Still Feels Loose After Tightening
If the sheet is still loose, the clips may be spaced unevenly, or the sheet may not be centered. Release the cord slightly, adjust the fabric, and tighten again.
Avoid solving looseness by pulling the cord too hard. Balanced tension works better than extreme tension.
Cord Gets Twisted or Tangled
If the cord twists, stop before tightening. Straighten it by hand and make sure it runs smoothly around the sheet.
A tangled cord can prevent even tightening and may cause one side of the sheet to feel tighter than the other.
Corners Pop Up After Setup
If corners still pop up, check whether the sheet pocket is deep enough for your mattress. Also, make sure the clips near that corner are attached securely.
You may need to reposition the clips closer to the problem corner to improve hold.
Extra Cord Hangs Below the Mattress
After locking the cord, tuck the extra length under the mattress. Do not leave it hanging. This keeps the setup cleaner and helps prevent the cord from being pulled accidentally.
How to Remove Bed Scrunchie Before Washing Sheets
Removing a Bed Scrunchie before washing your sheets is a quick and simple process once you know the right steps. Since the system is designed to stay attached around your mattress corners, you don’t need to completely disassemble everything every time. In most cases, you can loosen the straps, release the clips or fasteners, and remove the sheet without disturbing the entire setup. The key is to avoid pulling too hard, which helps protect both the Bed Scrunchie and your sheets.
Why You Should Remove It Before Laundry
The clips, cord, and lock are not meant to tumble freely in the washer or dryer with your bedding. Washing sheets with the system attached could tangle the cord or damage the parts.
Removing it also protects the sheet fabric from unnecessary pulling during the wash cycle.
How to Store the Clips and Cord Safely
After removing the Bed Scrunchie, keep all parts together in the storage pouch or a small container. This prevents missing clips and keeps the cord from getting tangled.
Before reinstalling it, check that the cord is straight and the clips are clean and ready to grip.
FAQs About Installing Bed Scrunchie
Installing a Bed Scrunchie is easier than it looks, but a few simple tips can make the process much smoother. Below, you’ll find answers to the most common questions about setting up a Bed Scrunchie, adjusting the straps, fitting different mattress sizes, troubleshooting common issues, and getting the best wrinkle-free results.
Can Bed Scrunchie damage bed sheets?
Bed Scrunchie should not damage sheets when installed carefully. To reduce stress on the fabric, avoid pulling the cord too hard and make sure the clips are attached properly.
How tight should the cord be?
The cord should be tight enough to keep the sheet smooth, but not so tight that the fabric looks strained. A snug, even fit is the best target.
Can you leave Bed Scrunchie attached between sheet changes?
It is better to remove it when washing sheets. If you are not washing the sheet and only adjusting the bed, you can leave it attached as long as the clips and cord remain secure.
Should the clips be placed on corners only?
No. The clips should be spread around the sheet edge, with extra attention near the corners. Spacing them out helps create more even tension.
Does Bed Scrunchie change mattress comfort?
No, Bed Scrunchie sits underneath the sheet and mattress edge. It should not make the mattress feel harder or softer while you sleep.
Is Bed Scrunchie safe for kids’ beds?
It can be used on kids’ beds when installed properly. Make sure the cord is locked and tucked under the mattress so nothing hangs loose.
What should you do if the sheet wrinkles after setup?
If wrinkles remain, release a little tension, smooth the sheet, check that it is centered, and tighten again. Wrinkles usually mean the fabric is pulling unevenly.
Final Thoughts on Installing Bed Scrunchie
Learning how to install Bed Scrunchie is mostly about understanding clip placement and cord tension. Once the clips are secure and the sheet is centered, the rest of the setup becomes simple.
For the best result, take your time during the first installation. Keep the clips evenly spaced, pull the cord slowly, and check the corners before finishing. If you have a heavy mattress or a thick topper, work one corner at a time instead of trying to lift the whole mattress.
After a few uses, installing the Bed Scrunchie becomes much quicker. With the right setup, it can help keep your fitted sheet tighter, smoother, and better secured through the night.
